The instructions below are specific to GitHub Actions, but the same concepts can be used with other CI systems.
Check out our new GitHub integration for automatic deployments, without adding any GitHub Actions workflows.

GitHub Actions example

This simple GitHub action workflow will deploy your Trigger.dev tasks when new code is pushed to the main branch and the trigger directory has changes in it.
The deploy step will fail if any version mismatches are detected. Please see the version pinning section for more details.
name: Deploy to Trigger.dev (prod)

on:
  push:
    branches:
      - main

jobs:
  deploy:
    runs-on: ubuntu-latest

    steps:
      - uses: actions/checkout@v4

      - name: Use Node.js 20.x
        uses: actions/setup-node@v4
        with:
          node-version: "20.x"

      - name: Install dependencies
        run: npm install

      - name: 🚀 Deploy Trigger.dev
        env:
          TRIGGER_ACCESS_TOKEN: ${{ secrets.TRIGGER_ACCESS_TOKEN }}
        run: |
          npx trigger.dev@latest deploy
If you already have a GitHub action file, you can just add the final step ”🚀 Deploy Trigger.dev” to your existing file.

Creating a Personal Access Token

1

Create a new access token

Go to your profile page and click on the “Personal Access Tokens” tab.
2

Go to your repository on GitHub.

Click on ‘Settings’ -> ‘Secrets and variables’ -> ‘Actions’ -> ‘New repository secret’
3

Add the TRIGGER_ACCESS_TOKEN

Add the name 
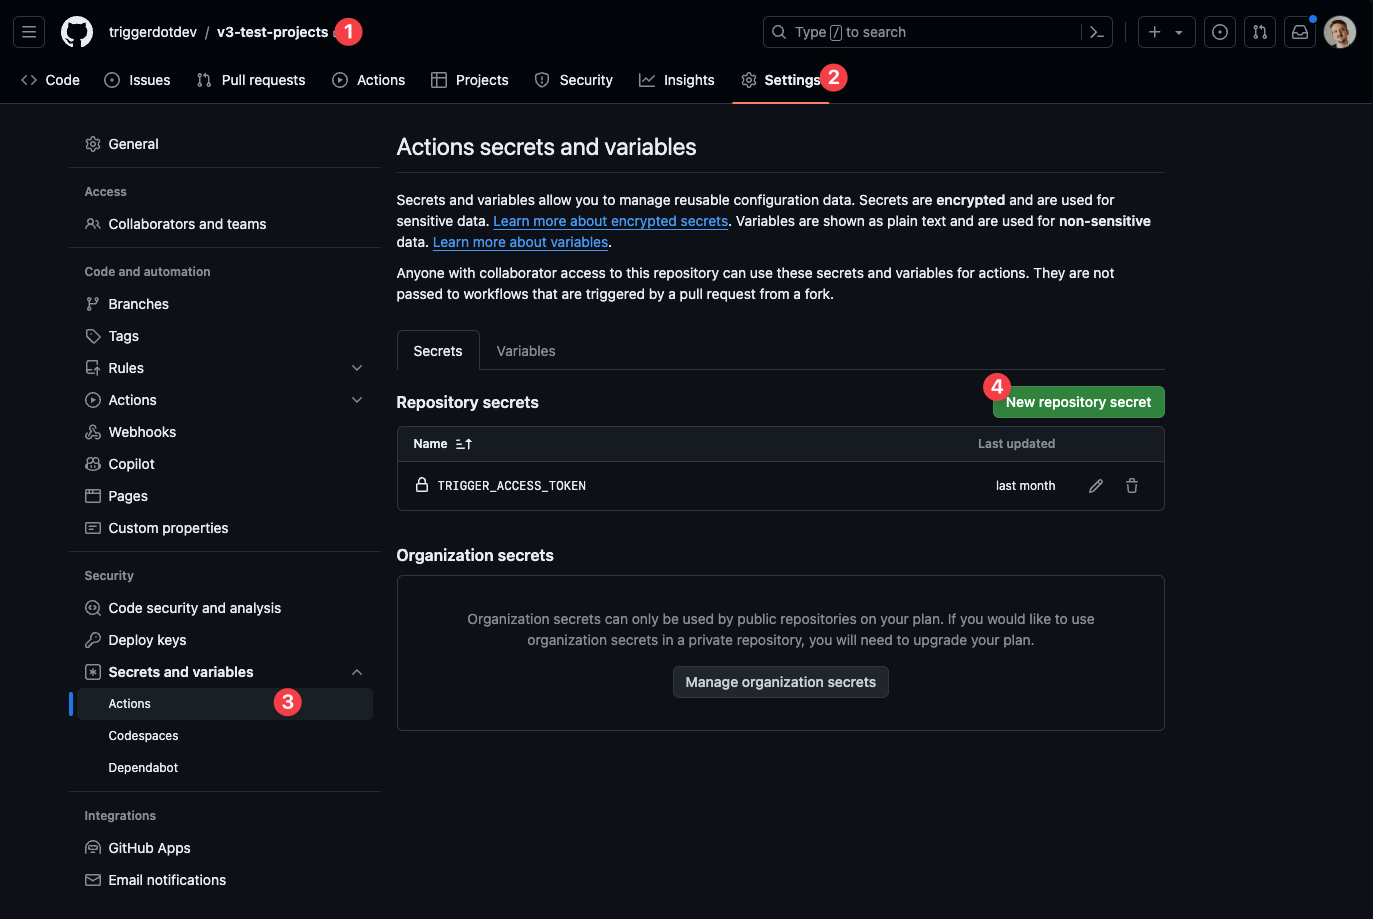
TRIGGER_ACCESS_TOKEN and the value of your access token. Add TRIGGER_ACCESS_TOKEN
in GitHub

CLI Version pinning

The CLI and @trigger.dev/* package versions need to be in sync with the trigger.dev CLI, otherwise there will be errors and unpredictable behavior. Hence, the deploy command will automatically fail during CI on any version mismatches. Tip: add the trigger.dev CLI to your devDependencies and the deploy command to your package.json file to keep versions managed in the same place. For example:
{
  "scripts": {
    "deploy:trigger-prod": "trigger deploy",
    "deploy:trigger": "trigger deploy --env staging"
  },
  "devDependencies": {
    "trigger.dev": "4.0.2"
  }
}
Your workflow file will follow the version specified in the package.json script, like so:
.github/workflows/release-trigger.yml
- name: 🚀 Deploy Trigger.dev
  env:
    TRIGGER_ACCESS_TOKEN: ${{ secrets.TRIGGER_ACCESS_TOKEN }}
  run: |
    npm run deploy:trigger
You should use the version you run locally during dev and manual deploy. The current version is displayed in the banner, but you can also check it by appending --version to any command.

Self-hosting

When self-hosting, you need to:
  • Set up Docker Buildx in your CI environment for building images locally.
  • Add your registry credentials to the GitHub secrets.
  • Specify the TRIGGER_API_URL environment variable pointing to your webapp domain, for example: https://trigger.example.com
name: Deploy to Trigger.dev (self-hosted)

on:
  push:
    branches:
      - main

jobs:
  deploy:
    runs-on: ubuntu-latest

    steps:
      - uses: actions/checkout@v4

      - name: Use Node.js 20.x
        uses: actions/setup-node@v4
        with:
          node-version: "20.x"

      - name: Install dependencies
        run: npm install

      - name: Set up Docker Buildx
        uses: docker/setup-buildx-action@v3
        with:
          version: latest

      - name: Login to DockerHub
        uses: docker/login-action@v3
        with:
          username: ${{ secrets.DOCKERHUB_USERNAME }}
          password: ${{ secrets.DOCKERHUB_TOKEN }}

      - name: 🚀 Deploy Trigger.dev
        env:
          TRIGGER_ACCESS_TOKEN: ${{ secrets.TRIGGER_ACCESS_TOKEN }}
          TRIGGER_API_URL: ${{ secrets.TRIGGER_API_URL }}
        run: |
          npx trigger.dev@latest deploy